Published: Feburary 2, 2026 | Last Updated: May 22, 2026 | By: Donny Zanger, Temporary Walls NYC
Quick Facts — Temporary Wall Cost NYC 2026

NYC rent is brutal. Space is always too small. But there is a fix that thousands of New Yorkers use every year.
A temporary wall. The temporary wall cost NYC 2026 starts at $700. Most full installs — a floor-to-ceiling wall with a door — run between $1,000 and $1,800. Premium setups with glass doors and soundproofing reach $3,500.
We install in Manhattan, Brooklyn, Queens, the Bronx, and Staten Island. Manhattan runs about 10–15% higher than Brooklyn or Queens. But the quality is identical everywhere we work.
This guide covers everything. You will see prices by wall type, by add-on, and by borough. No vague ranges. No hidden surprises. Just the real numbers from a team that installs these walls every week.
A temporary wall in NYC costs $700 to $3,500. The price depends on three things: the type of wall, the size of the room, and any add-ons you choose.
Most renters pay between $1,000 and $1,800 for a standard pressurized wall with a door. That covers all materials and full installation. There are no extra charges on the day of the install.
Here is what moves the price up or down:
The good news: wall removal is included. When you move out, we take it down for free.
There are four main types of temporary walls in NYC. Each one has a different price and a different use. Here is how they compare.
| Wall Type | Price Range | Best For |
|---|---|---|
| Pressurized Wall | $700–$1,500 | Most NYC rentals — fast, clean, removable |
| Freestanding Wall | $300–$900 | No-permission option — does not touch the ceiling |
| Bookcase Wall | $1,200–$2,500 | Privacy + built-in shelving — landlord-friendly |
| Flex Wall (Full Build) | $1,000–$3,500 | Full room conversion with custom doors and finishes |
Pressurized walls are the most popular. They go from floor to ceiling and use a pressure system to stay in place. No nails. No screws. No damage to your apartment.
Bookcase walls cost more. However, they give you shelving built right into the wall. They are also the easiest type to get landlord approval for. In fact, most Manhattan management companies approve them on the first request.
Freestanding walls are the lowest-cost option. They stop a few inches below the ceiling. Because of that, many buildings allow them without written landlord approval.
Five things drive the cost of any temporary wall install. Understanding these will help you plan your budget before you call us.
A longer wall costs more. A 10-foot wall costs more than a 6-foot wall. Ceiling height also adds to the price. Most NYC apartments have 8–9 foot ceilings. However, SOHO and Tribeca lofts often reach 12 feet — and that adds to the quote.
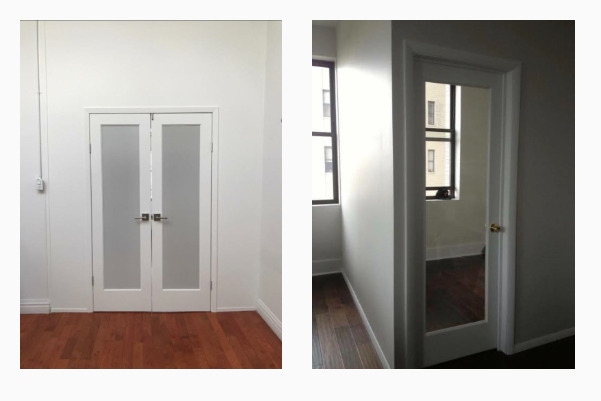
Every wall comes with a door. But the style matters. A basic swing door is included in the base price. A sliding pocket door or frosted glass door costs more. We cover door pricing in the next section.
A basic wall reduces some noise. But it does not block sound completely. Adding mineral wool insulation inside the wall cavity costs $200–$500 more. It is worth it for home offices in Midtown or nurseries in Park Slope.
A standard wall has visible seams where the panels meet. A seamless finish hides those seams so the wall looks like it was always there. This upgrade adds $150–$350. It is most popular in SOHO lofts and Manhattan doorman buildings.
Manhattan costs more than Brooklyn. Brooklyn costs slightly more than Queens. The Bronx and Staten Island are the most affordable. We break this down in full below.
Every wall comes with a standard door included. However, you can upgrade. Here is the full list of add-ons and what each one costs.
| Add-On | Extra Cost | Notes |
|---|---|---|
| Standard swing door | Included | Solid or hollow core. Works in every building. |
| Sliding pocket door | +$400–$800 | Space-saving. Great for small rooms in LIC and Midtown. |
| French doors | +$300–$700 | Classic look. Popular in Park Slope and Carroll Gardens. |
| Frosted glass door | +$300–$600 | Light + privacy. Most popular in SOHO and Tribeca lofts. |
| Full glass panel + door | +$500–$900 | Design-forward. Flatiron, Tribeca, SOHO. |
| Soundproofing — mineral wool | +$200–$400 | STC 35–42. Recommended for home offices and nurseries. |
| Soundproofing — acoustic board | +$300–$500 | STC 40–45. Near-permanent-wall performance. |
| Seamless (no-seam) finish | +$150–$350 | Looks like a real wall. Popular in Manhattan doorman buildings. |
| Interior window | +$200–$400 | Adds light to an inner room. Great for studios. |
| Monitor/TV mount reinforcement | +$0–$150 | Internal blocking for heavy screens — built during install. |
The most popular combination is mineral wool soundproofing + solid-core swing door. It gives you real noise privacy and costs around $1,300–$1,800 in most NYC boroughs.
Not sure what your wall will cost?
📞 Call us: +1 (646) 494-5480
Free quote · We respond within the hour · All 5 boroughs
Where you live affects the price. Manhattan installs run 10–15% higher than Brooklyn or Queens. The materials are exactly the same. However, labor costs and demand vary by borough and by neighborhood.
Here is the full 2026 borough breakdown:
| Borough | Basic Wall | With Soundproofing | With Glass Door | Price vs Average |
|---|---|---|---|---|
| Manhattan | $1,100–$1,600 | $1,300–$2,000 | $1,400–$2,200 | 10–15% above average |
| Brooklyn | $900–$1,400 | $1,100–$1,800 | $1,200–$1,900 | Average — best value |
| Queens | $850–$1,350 | $1,050–$1,700 | $1,150–$1,850 | 5–10% below average |
| The Bronx | $800–$1,300 | $1,000–$1,600 | $1,100–$1,700 | Lowest price point |
| Staten Island | $800–$1,300 | $1,000–$1,600 | $1,100–$1,700 | Lowest — fast scheduling |
Neighborhoods within each borough also vary. Here is what to expect by area:
Price by Neighborhood — 2026
The wall quality is the same across all five boroughs. Only the price changes — not the materials and not the team.
According to StreetEasy’s guide to temporary walls for NYC apartments, landlord approval policies also vary significantly by borough — which can affect which wall type you choose and therefore the cost.
Soundproofing adds $200–$500 to any wall install. That is a small amount for what you get in return.
Without soundproofing, a basic wall cuts some noise. But you can still hear conversation from the other side. That is fine for a spare room. However, it is not enough for a home office in Flatiron or a nursery in Park Slope.
With mineral wool insulation inside the wall cavity, the wall reaches an STC rating of 35–42. A standard NYC apartment wall sits at 35–40 STC. So a soundproofed temporary wall matches the permanent walls already in your apartment.
For the heaviest-duty noise control, we use acoustic board. That reaches STC 40–45. It is popular in pre-war SOHO lofts and Midtown Manhattan apartments where street noise is constant.
For full details on soundproofing options, visit our soundproofing walls NYC page.
Removal is included in your Temporary Walls NYC quote. There is no separate removal fee.
When you are ready to move out, you call us. We come back and take the wall down cleanly. No holes. No damage to the floor, ceiling, or paint. Your security deposit stays safe.
Most other companies charge $300–$1,000 for removal. We include it because we built the wall, and we know exactly how it comes apart. That is the advantage of working with the original installer.
Yes — and the math makes it very clear.
Say you rent a 1-bedroom in Park Slope for $3,200/month. You add a flex wall for $1,200. Now you split the apartment with a roommate. Each of you pays $1,600/month. The wall pays for itself in Month 1.
Compare that to renting a 2-bedroom in Park Slope: around $4,500/month. The 1-bedroom flex with a wall costs $3,200/month plus a one-time $1,200 wall install. In the first year, you save over $3,300.
Or consider a studio in Williamsburg at $2,400/month. A pressurized wall creates a separate sleeping area. You get a functional 1-bedroom layout for the price of a studio.
In Astoria, Queens, a bookcase wall turns a living room into a proper third bedroom. That eliminates the need to move to a more expensive apartment. The savings are real. The wall is a one-time cost. The math always works.
For a complete guide to how temporary walls work and what they can do in your space, read our ultimate guide to temporary walls in NYC.
A temporary wall in NYC costs $700 to $3,500 in 2026. Basic pressurized walls start at $700. A standard floor-to-ceiling wall with a swing door runs $1,000–$1,500. Premium setups with soundproofing and glass doors reach $3,500. Most renters in Manhattan pay $1,100–$1,800. Brooklyn and Queens run $900–$1,500. Get a free quote and receive an exact price within the hour.
Freestanding walls are the cheapest temporary wall option in NYC, starting at $300. They do not reach the ceiling, so many buildings allow them without landlord approval. Pressurized walls start at $700. Bookcase walls range from $1,200 to $2,500. Flex walls with full customization run $1,000–$3,500.
Yes. Manhattan temporary wall installations run 10–15% higher than Brooklyn or Queens. A basic pressurized wall starts at $1,100 in Manhattan versus $900 in Brooklyn. The materials are identical across all boroughs. The price difference reflects labor costs and demand. The Bronx and Staten Island offer the lowest prices in NYC.
Soundproofing adds $200–$500 to any temporary wall installation in NYC. Mineral wool insulation is the most common upgrade, pushing the wall’s STC rating to 35–42. That matches the performance of standard permanent apartment walls. Acoustic board adds $300–$500 and reaches STC 40–45. Both are installed during the original build — no second visit required.
Yes — Temporary Walls NYC includes wall removal in every installation quote. There is no separate removal fee. When you move out, you call us and we take the wall down cleanly. No holes, no damage, no impact on your security deposit. Most other companies charge $300–$1,000 for standalone removal.
A flex wall is a floor-to-ceiling pressurized partition that divides a room into two separate spaces. In NYC, flex walls cost $1,000–$3,500 depending on size, door type, and add-ons like soundproofing or a seamless finish. They are the most common way to convert a 1-bedroom apartment into a 2-bedroom, or a studio into a functional 1-bedroom layout.
Ready to find out your exact price? Tell us your room size and borough. We will give you a free quote within the hour — no waiting, no vague estimates.
Temporary Walls NYC has installed walls in every borough, in every building type, for over a decade. From a simple studio divider in Williamsburg to a full flex room with glass doors in a SOHO loft — we do it all. And removal is always included.
Contact Temporary Walls NYC
✉️ quotes@temporarywallsnyc.com
Get My Free Quote →Same-day quote · Same-week install · All 5 boroughs · Removal included
About the Author: Donny Zanger
Donny Zanger is the founder of Temporary Walls NYC and has been installing pressurized, flex, and bookcase walls across New York City for over a decade. He has completed thousands of installations in Manhattan, Brooklyn, Queens, the Bronx, and Staten Island. Every price in this guide comes from real 2026 installation data. Last updated: June 2026.