With the right door, your living space can be more functional, aesthetically pleasing, and durable. There are many different types of doors to choose from, including sliding doors NYC and folding. If you’re thinking about installing a new door in your home, you may be wondering what the difference is between these two options. Read on to learn how they differ—and why one might be better suited than the other for your project!
Here are a few key differences between sliding and folding doors.
If you’re looking to fill a space with as much light as possible, folding doors might be a better option than sliding. Folded panels offer more surface area for the sun or natural light to shine through, meaning you’ll have less of an issue with dark rooms. If you’re trying to open up an enclosed space and let it get some fresh air (whether it’s an office or a laundry room), foldable doors are also your best bet. This is especially true if you live in areas where snowfall is common—the extra material when folded allows them to hold up against heavier snow loads without collapsing or getting damaged easily.
You can tell that a folding door is smaller than a sliding door because it folds up into the wall, which makes them more compact. Sliding doors aren’t as small, but they are larger and more expansive.
If you’re thinking about using your garage for storage or work space, then a folding door might be the best choice for you. Folding doors are better suited to tiny spaces where there’s no room for anything else. They’re also great at hiding clutter because they can be folded up against the wall when not in use.
Sliding doors, on the other hand, are great if you have plenty of space in your garage and want to maximize it by opening up onto as much space as possible while still keeping everything covered by one door when closed (as opposed to having multiple closable walls).
Cost is another major factor to consider when choosing a door for your home. While there are many factors that could cause sliding doors to be more expensive than folding, hinged, or bi-folding doors (for example, the size and thickness of the glass used), we have found that on average:
Sliding doors are more expensive than folding and bi-folding doors because they have to be specially made. The tracks need to incorporate an electric motor as well as some sort of locking mechanism, while other parts will also need replacing if they get damaged over time. If you have any doubts about whether you’re able to install a particular type of door yourself – or indeed whether it can fit through your doorway at all – then this extra expense should definitely be factored into your calculations.
It’s no secret that sliding doors are more stylish, but what about folding doors? It’s true that they’re more traditional and classic looking. They also come with a higher price tag—but don’t let that scare you away!
Folding doors are often made of wood or metal while sliding ones can be made out of either material. This gives them the advantage of being more durable than their folding counterparts because they’re less likely to get damaged during installation or use. As far as energy efficiency goes, both types perform equally well (so long as they’re installed properly). The bottom line: if you want to save money on your new door purchase, go with a folding one; otherwise, consider how much style matters when making your decision between these two types of products.
Sliding doors are also more durable. Since they don’t fold, they won’t warp or crack like folding doors can. Additionally, sliding doors are easier to repair than folding doors because you don’t need to disassemble the door to get access to parts that may be broken or damaged. All in all, sliding doors offer more durability than their folding counterparts and therefore last longer with proper care and maintenance!
Another benefit of choosing a sliding door over folding ones is that they use less energy when opening and closing due to their larger size (which also makes them quieter). They’ll keep your home warmer during cold months while keeping out noise from outside during warm weather months.
When considering the functionality of your door, you should consider the room’s traffic. If it has a high amount of traffic, sliding doors are better because they give you more room to move around. You can also use them in rooms with large furniture and a lot of windows.
Folding doors are great for low-traffic areas like bedrooms or offices because they allow you to create smaller spaces within larger rooms without losing too much space on either side of each panel (you’ll want at least 1/2″ between each panel). They’re also great if there isn’t enough wall space for sliding doors, or if your home has an open layout where adding movable walls would be inconvenient or impractical.
Sliding and folding doors each have their advantages, but the best type of door for you depends on your location, budget, and aesthetic preferences.
Sliding doors are generally more expensive than folding doors. They also tend to be sturdier, which is why they’re better suited for locations where space is at a premium. For example, if you have a small apartment that has limited storage space and no room for furniture, sliding doors would be the correct choice because they don’t take up any extra floor space.
If you are looking for a company that can help you with your Temporary walls new york city service needs, then look no further than us. We are a full-service company that can handle all of your needs and ensures that you are completely satisfied.
We offer the following services:
Don’t wait until you need us. We’re here for all of your temporary walls NYC services. Call us today at (347) 553-1945.
Sliding and folding doors are great options for many homes and businesses. They can be used to create a new entrance or exit to your home or make it easier to get into a room while still allowing airflow through the space. Sliding doors are useful in situations where space is at a premium, while folding doors may be more convenient when it comes time for maintenance work on an older building.
Published: Feburary 2, 2026 | Last Updated: May 22, 2026 | By: Donny Zanger, Temporary Walls NYC
Quick Facts — Temporary Wall Cost NYC 2026

NYC rent is brutal. Space is always too small. But there is a fix that thousands of New Yorkers use every year.
A temporary wall. The temporary wall cost NYC 2026 starts at $700. Most full installs — a floor-to-ceiling wall with a door — run between $1,000 and $1,800. Premium setups with glass doors and soundproofing reach $3,500.
We install in Manhattan, Brooklyn, Queens, the Bronx, and Staten Island. Manhattan runs about 10–15% higher than Brooklyn or Queens. But the quality is identical everywhere we work.
This guide covers everything. You will see prices by wall type, by add-on, and by borough. No vague ranges. No hidden surprises. Just the real numbers from a team that installs these walls every week.
A temporary wall in NYC costs $700 to $3,500. The price depends on three things: the type of wall, the size of the room, and any add-ons you choose.
Most renters pay between $1,000 and $1,800 for a standard pressurized wall with a door. That covers all materials and full installation. There are no extra charges on the day of the install.
Here is what moves the price up or down:
The good news: wall removal is included. When you move out, we take it down for free.
There are four main types of temporary walls in NYC. Each one has a different price and a different use. Here is how they compare.
| Wall Type | Price Range | Best For |
|---|---|---|
| Pressurized Wall | $700–$1,500 | Most NYC rentals — fast, clean, removable |
| Freestanding Wall | $300–$900 | No-permission option — does not touch the ceiling |
| Bookcase Wall | $1,200–$2,500 | Privacy + built-in shelving — landlord-friendly |
| Flex Wall (Full Build) | $1,000–$3,500 | Full room conversion with custom doors and finishes |
Pressurized walls are the most popular. They go from floor to ceiling and use a pressure system to stay in place. No nails. No screws. No damage to your apartment.
Bookcase walls cost more. However, they give you shelving built right into the wall. They are also the easiest type to get landlord approval for. In fact, most Manhattan management companies approve them on the first request.
Freestanding walls are the lowest-cost option. They stop a few inches below the ceiling. Because of that, many buildings allow them without written landlord approval.
Five things drive the cost of any temporary wall install. Understanding these will help you plan your budget before you call us.
A longer wall costs more. A 10-foot wall costs more than a 6-foot wall. Ceiling height also adds to the price. Most NYC apartments have 8–9 foot ceilings. However, SOHO and Tribeca lofts often reach 12 feet — and that adds to the quote.
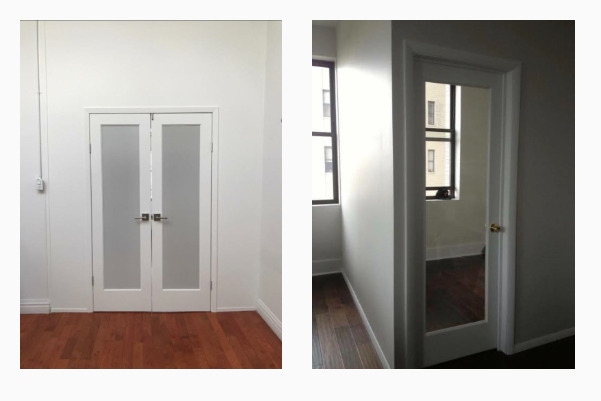
Every wall comes with a door. But the style matters. A basic swing door is included in the base price. A sliding pocket door or frosted glass door costs more. We cover door pricing in the next section.
A basic wall reduces some noise. But it does not block sound completely. Adding mineral wool insulation inside the wall cavity costs $200–$500 more. It is worth it for home offices in Midtown or nurseries in Park Slope.
A standard wall has visible seams where the panels meet. A seamless finish hides those seams so the wall looks like it was always there. This upgrade adds $150–$350. It is most popular in SOHO lofts and Manhattan doorman buildings.
Manhattan costs more than Brooklyn. Brooklyn costs slightly more than Queens. The Bronx and Staten Island are the most affordable. We break this down in full below.
Every wall comes with a standard door included. However, you can upgrade. Here is the full list of add-ons and what each one costs.
| Add-On | Extra Cost | Notes |
|---|---|---|
| Standard swing door | Included | Solid or hollow core. Works in every building. |
| Sliding pocket door | +$400–$800 | Space-saving. Great for small rooms in LIC and Midtown. |
| French doors | +$300–$700 | Classic look. Popular in Park Slope and Carroll Gardens. |
| Frosted glass door | +$300–$600 | Light + privacy. Most popular in SOHO and Tribeca lofts. |
| Full glass panel + door | +$500–$900 | Design-forward. Flatiron, Tribeca, SOHO. |
| Soundproofing — mineral wool | +$200–$400 | STC 35–42. Recommended for home offices and nurseries. |
| Soundproofing — acoustic board | +$300–$500 | STC 40–45. Near-permanent-wall performance. |
| Seamless (no-seam) finish | +$150–$350 | Looks like a real wall. Popular in Manhattan doorman buildings. |
| Interior window | +$200–$400 | Adds light to an inner room. Great for studios. |
| Monitor/TV mount reinforcement | +$0–$150 | Internal blocking for heavy screens — built during install. |
The most popular combination is mineral wool soundproofing + solid-core swing door. It gives you real noise privacy and costs around $1,300–$1,800 in most NYC boroughs.
Not sure what your wall will cost?
📞 Call us: +1 (646) 494-5480
Free quote · We respond within the hour · All 5 boroughs
Where you live affects the price. Manhattan installs run 10–15% higher than Brooklyn or Queens. The materials are exactly the same. However, labor costs and demand vary by borough and by neighborhood.
Here is the full 2026 borough breakdown:
| Borough | Basic Wall | With Soundproofing | With Glass Door | Price vs Average |
|---|---|---|---|---|
| Manhattan | $1,100–$1,600 | $1,300–$2,000 | $1,400–$2,200 | 10–15% above average |
| Brooklyn | $900–$1,400 | $1,100–$1,800 | $1,200–$1,900 | Average — best value |
| Queens | $850–$1,350 | $1,050–$1,700 | $1,150–$1,850 | 5–10% below average |
| The Bronx | $800–$1,300 | $1,000–$1,600 | $1,100–$1,700 | Lowest price point |
| Staten Island | $800–$1,300 | $1,000–$1,600 | $1,100–$1,700 | Lowest — fast scheduling |
Neighborhoods within each borough also vary. Here is what to expect by area:
Price by Neighborhood — 2026
The wall quality is the same across all five boroughs. Only the price changes — not the materials and not the team.
According to StreetEasy’s guide to temporary walls for NYC apartments, landlord approval policies also vary significantly by borough — which can affect which wall type you choose and therefore the cost.
Soundproofing adds $200–$500 to any wall install. That is a small amount for what you get in return.
Without soundproofing, a basic wall cuts some noise. But you can still hear conversation from the other side. That is fine for a spare room. However, it is not enough for a home office in Flatiron or a nursery in Park Slope.
With mineral wool insulation inside the wall cavity, the wall reaches an STC rating of 35–42. A standard NYC apartment wall sits at 35–40 STC. So a soundproofed temporary wall matches the permanent walls already in your apartment.
For the heaviest-duty noise control, we use acoustic board. That reaches STC 40–45. It is popular in pre-war SOHO lofts and Midtown Manhattan apartments where street noise is constant.
For full details on soundproofing options, visit our soundproofing walls NYC page.
Removal is included in your Temporary Walls NYC quote. There is no separate removal fee.
When you are ready to move out, you call us. We come back and take the wall down cleanly. No holes. No damage to the floor, ceiling, or paint. Your security deposit stays safe.
Most other companies charge $300–$1,000 for removal. We include it because we built the wall, and we know exactly how it comes apart. That is the advantage of working with the original installer.
Yes — and the math makes it very clear.
Say you rent a 1-bedroom in Park Slope for $3,200/month. You add a flex wall for $1,200. Now you split the apartment with a roommate. Each of you pays $1,600/month. The wall pays for itself in Month 1.
Compare that to renting a 2-bedroom in Park Slope: around $4,500/month. The 1-bedroom flex with a wall costs $3,200/month plus a one-time $1,200 wall install. In the first year, you save over $3,300.
Or consider a studio in Williamsburg at $2,400/month. A pressurized wall creates a separate sleeping area. You get a functional 1-bedroom layout for the price of a studio.
In Astoria, Queens, a bookcase wall turns a living room into a proper third bedroom. That eliminates the need to move to a more expensive apartment. The savings are real. The wall is a one-time cost. The math always works.
For a complete guide to how temporary walls work and what they can do in your space, read our ultimate guide to temporary walls in NYC.
A temporary wall in NYC costs $700 to $3,500 in 2026. Basic pressurized walls start at $700. A standard floor-to-ceiling wall with a swing door runs $1,000–$1,500. Premium setups with soundproofing and glass doors reach $3,500. Most renters in Manhattan pay $1,100–$1,800. Brooklyn and Queens run $900–$1,500. Get a free quote and receive an exact price within the hour.
Freestanding walls are the cheapest temporary wall option in NYC, starting at $300. They do not reach the ceiling, so many buildings allow them without landlord approval. Pressurized walls start at $700. Bookcase walls range from $1,200 to $2,500. Flex walls with full customization run $1,000–$3,500.
Yes. Manhattan temporary wall installations run 10–15% higher than Brooklyn or Queens. A basic pressurized wall starts at $1,100 in Manhattan versus $900 in Brooklyn. The materials are identical across all boroughs. The price difference reflects labor costs and demand. The Bronx and Staten Island offer the lowest prices in NYC.
Soundproofing adds $200–$500 to any temporary wall installation in NYC. Mineral wool insulation is the most common upgrade, pushing the wall’s STC rating to 35–42. That matches the performance of standard permanent apartment walls. Acoustic board adds $300–$500 and reaches STC 40–45. Both are installed during the original build — no second visit required.
Yes — Temporary Walls NYC includes wall removal in every installation quote. There is no separate removal fee. When you move out, you call us and we take the wall down cleanly. No holes, no damage, no impact on your security deposit. Most other companies charge $300–$1,000 for standalone removal.
A flex wall is a floor-to-ceiling pressurized partition that divides a room into two separate spaces. In NYC, flex walls cost $1,000–$3,500 depending on size, door type, and add-ons like soundproofing or a seamless finish. They are the most common way to convert a 1-bedroom apartment into a 2-bedroom, or a studio into a functional 1-bedroom layout.
Ready to find out your exact price? Tell us your room size and borough. We will give you a free quote within the hour — no waiting, no vague estimates.
Temporary Walls NYC has installed walls in every borough, in every building type, for over a decade. From a simple studio divider in Williamsburg to a full flex room with glass doors in a SOHO loft — we do it all. And removal is always included.
Contact Temporary Walls NYC
✉️ quotes@temporarywallsnyc.com
Get My Free Quote →Same-day quote · Same-week install · All 5 boroughs · Removal included
About the Author: Donny Zanger
Donny Zanger is the founder of Temporary Walls NYC and has been installing pressurized, flex, and bookcase walls across New York City for over a decade. He has completed thousands of installations in Manhattan, Brooklyn, Queens, the Bronx, and Staten Island. Every price in this guide comes from real 2026 installation data. Last updated: June 2026.
For those who are struggling with not having enough rooms, especially in apartments or residences where space is a premium, one potential solution is a L shaped room divider NYC. In fact, there are many such dividers being used across the country to create simple rooms for a wide variety of uses.
Perhaps the most common use for such a divider is to create storage space inside a larger room. They are relatively simple to set up and even a professional installed L shaped divider does not take long to accomplish.
What is an L Shaped Room Divider NYC?
This is a room divider that partitions part of a room but does not go all the way across. It is shaped like the letter “L” and is used in residences, offices, and even facilities where an extra room is needed. Plus, they are perfect for when traditional dividers that go straight across are not practical. They are quite popular and can be found in residences, commercial buildings, and facilities that need to create a new area within a room.
Dividers can be made from different materials ranging from fabric for temporary walls, such as what you see in hospital rooms. Stand up dividers that you see in many offices to create a temporary division of a room. Or, you can choose a more permanent divider that is built or crafted from a pressurized wall that seals off a section of the room.
The divider may be solid if temporary, or you can have a door or entrance installed depending on your needs. Depending on the provider, you may find that such dividers come with additional features that make them better suited to the space that you have.
Why Choose a Divider?
There are good reasons why this type of divider may be perfect for your needs. This is especially true if a traditional divider is simply not practical or affordable for your space.
Storage Space: An L shaped room divider creates a small room in the corner that is perfect for storing items, clothing, and other things that you need. It’s great for loft spaces where you want to put important items away or out of view. You can shape the divider as you need to ensure that what you have is not seen.
Office: You can create a home office inside your bedroom, den, or any other room in the home that works for you. In fact, many offices use L shaped dividers to create another office just big enough for a desk and needed equipment. So, you might find this to be the perfect solution when creating an additional office for the home.
Low Cost: A good L shaped divider is low in cost and under normal circumstances will last for years with minimal maintenance. This is because they are made from high-quality materials designed to handle the indoor environment.
If you are looking to add another room to your residence, office, or facility and do not have much space, then an L shaped room divider may be the answer.
Those who live in the New York City area are very familiar with dividing an apartment with temporary walls nyc. These temporary walls range from $1000 to $2000 in prices, depending on the wall type and size. These walls serve great purposes, as they can turn a one-bedroom space into two.
For a very long time, temporary walls have stood to be a cost-effective solution to privacy in apartments. People who live in apartments and still want to optimize their privacy often go for temporary walls. Some of these walls also act as storage spaces – this is also apt for people who share apartments and require a wider space.
Types of Temporary Walls NYC
Various wall types exist, but only three are the major ones designed to meet the particular needs of homeowners and renters. With unique and impressive features of each wall type, it’s good to make proper analysis before settling for one. It’s good you get an approval from your landlord before you make an order for such walls –this is if you’re not a homeowner.
Pressurized walls
Pressurized walls appear to be the most popular of all wall types, and have a unique feature of stretching up to the ceiling level. It gives a look of a true wall and it’s called “pressurized’ because it doesn’t attach to the ceiling or floor walls directly. It works in a way that its ends are pushed against the surrounding structure. This is the idea behind its firm nature when installed.
Pressurized walls are temporary and can be removed without any form of damage to the original house structure. However, it’s quite a hassle to get a pressurized wall installed in NYC because most buildings can’t incorporate temporary walls.
Partial Walls
While pressurized walls appear harder to get and install in an apartment, partial walls are becoming trendy. Just like pressurized walls, partial walls don’t require attachments to hold it in place. However, they are often void of doors, and don’t go as high as pressurized walls; around 1 or 1ft 2” below the ceiling. The supposed door position can always be covered with a curtain.
Bookshelf
For this wall type, more storage space is guaranteed, and it comes in various designs. This type of wall is designed to have shelving which can hold various items, creating enough space in an apartment. So, if you stay in an apartment where you desire to have more space, perhaps for other activities, or just to free up your room, then you might need to have a bookshelf type of wall.
What’s the catch? Various brands in NYC can sell pressurized walls to you, but you need some sort of approval from your landlord before you alter his apartment. Check out the prices quoted by different brands, and compare with your budget. Please note that there might be a very slight difference in quality, but all companies follow the same rules enacted by the city.
To those of us suffering the consequences, the following statistic will not come as surprise: the price of New York real estate rose 5.2% over the past year alone.
CBS Money Watch ranked Manhattan as the number one most expensive city to live in in America, based on the prices of things like rent, a cup of coffee, a meal out, a haircut and other everyday expenses. The average rent for a 2-bedroom apartment in Manhattan is $4,042 per month, or about $48,500 a year, while the average annual take-home salary is $84,000. Considering real estate agents and financial experts recommend spending no more than 25% of your salary on your rent, these numbers are not matching up.
The sad truth is not that New Yorkers want to overspend on their shelter situation or that they can’t bear to give up the luxury living they are accustomed to – luxury living is hardly the case for the majority of these urban dwellers. Rather, Manhattanites are forced to dig deeper and deeper into their pockets just in order to live somewhere that is barely sanitary and functional.
It’s not just the young professionals who are feeling the squeeze. With its prestigious preschools, expansive parks and attractive lifestyle, more and more young families are putting down roots in this historic city. Yet these hard working mothers and fathers feel trapped in apartments that are way too small for their growing families…but how could they afford a place with more bedrooms?
As families get older, siblings who used to love the fun of sharing a room are now teenagers who no longer find it so appealing. Even upper middle-class business owners and employees making generous, comfortable salaries can’t shell out the sums required for a bigger place; rent prices are rising disproportionately to salary increases.
Now, more than ever, city residents need a solution – a clever way to sidestep the issues without dishing out more money or giving up on the privacy they need.
It’s amazing what a pressurized wall can do.
Temporary, non-damaging pressurized walls are the solution for New York City students, professionals and families. These stable structures are just as sturdy and unobtrusive as an ordinary wall, yet they can be installed wherever your apartment needs it most. All of a sudden, one shared bedroom is two separate havens for your privacy-seeking teenagers or the perfect spot to put your precious new arrival.
With customizable heights, a pressurized wall can be fit exactly to the specifications of your apartment, so that it runs from floor to ceiling with no gaps or spaces. A door frame and standard size door complete the look, so that no one is even able to tell which wall was not built originally.
To take it one step further, pressurized walls can include windows, closets, French doors…just about anything a standard wall includes, from the most basic college dorm to the most luxurious Manhattan penthouse.
Maybe one day in the far off future, salaries will tenfold while rent prices drop, but until then, New Yorkers will find that a temporary wall offers them the solution they are seeking.
For those who are considering whether pressurized walls are the right choice for their residence or business, safety is one of the factors that often comes up. On the surface, a pressurized wall may seem to have obvious safety issues because it is not permanent and is held in place by simple pressure and not any nails, glue, or other adhesive.
However, the safety record of pressurized walls when properly placed is quite good which means that you should feel confidence if you choose the right company to install the wall. As with any product, its quality depends on the materials used and the installation process that puts it in place.
As the name implies, the walls are held in place by pressure that is exerted from the wall itself to the surrounding walls, floor, and ceiling. Because no nails or adhesives are used, the pressurized walls leave no marks which means that when removed, the room will retain its previous condition without any permanent marking or indication that a wall had been in place.
Because they do not cause any damage to the existing structure, this has allowed pressurized walls to be used in apartment complexes that otherwise would not allow them. Once the wall is ready to be removed, the pressure is released, and the wall taken down. There is some general cleaning to remove any dust, dirt, or other debris that might have built up around where the wall once stood, but otherwise there is no indication that a wall has been there.
Safety Factor
Because no permanent fasteners, nails, adhesives, or other connectors are used, there are some who believe that pressurized walls are subject to being tipped over and represent a safety hazard. However, the pressure itself keeps the wall in place and it would take considerable force to even move the wall, much less tip it over.
The safety record of pressurized walls demonstrates that when they are placed by a reputable company, they are quite safe and will withstand the normal impacts that permanent walls endure. While pressurized walls may not quite be as sturdy compared to the permanent walls that are fixed in place inside your apartment, home, or business, they are quite strong and will hold up well even when accidentally impacted.
This means that you can even hang pictures or light materials on the wall without worry about compromising their stability. When properly installed, the seamless versions will blend in beautifully with the rest of your residence or business. Even the non-seamless versions still provide a strong safety factor which means that you can trust them to stand for years with minimal maintenance.
If you are looking to set up a new room inside your residence or business, putting up a pressurized wall will provide the privacy and security you want without compromising safety. You will need to hire the right company that has a well-established reputation for their service and backs it up with a warranty.
You probably have heard about pressurized walls, but may not know about the materials that are used, how they are constructed, and how they are installed. For those who are thinking about creating another room inside their residence or business, a pressurized wall is the right answer for several reasons.
How They are Constructed
A pressurized wall is a temporary wall that is constructed out of sheet rock or plasterboard, metal, and wood. Most installation companies will use lattice strips of the wood to cover the joins on the drywall itself. The frame is set up first and once completed, the sheet rock screws are used to attach the drywall to the framework.
The 2 x 4s are pressurized so their contact with the floor, ceiling, and walls are firm. To prevent any damage to the structure or architecture of the residence or business, T-nuts along with leveling screw pads are used when pressed against the studs. Because of the pressure that is exerted, there are no fasteners or adhesives used to provide additional stability. To use such items would damage the floor, walls, and ceiling. The pressure alone is more than enough to keep the wall in place while causing no damage to the surrounding materials.
Safety Features
When putting a door into a pressurized wall, it is recommended that French-style or hollow core doors are used so that the weight distribution does not cause a shift to the balance of the wall itself. This means that the doors are generally lightweight so that the pressure exerted by the wall is not compromised by an open door.
Over the years, advancements in materials and techniques have resulted in pressurized walls that are safe when installed by a reputable company. Because concerns about their stability and safety have faded over the years thanks to their remarkable service, more landlords are allowing them to be used inside apartment complexes. In New York City, it is common for additional rooms to be created using a pressurized wall with the condition that they be removed once the apartment is vacated.
For a time in New York City, some in authority wanted the pressurized walls removed because they did not comply with building codes and were perceived as a safety hazard. However, no laws were passed in terms of banning the installation, use, and regulation of the walls themselves. To this date, pressurized walls have no real definition under the current NYC building codes and there is no sign that it will change anytime soon.
Today, pressurized walls have expanded far beyond the New York City area where they were most prominent. They can be found in Pennsylvania and as far west as California. They are most popular in expensive tenement buildings where renting out an extra room is a common practice. This is why for many young professionals pressurized walls have become a popular way to rent out extra space and provide less expensive housing for those who live in the heart of the city.